
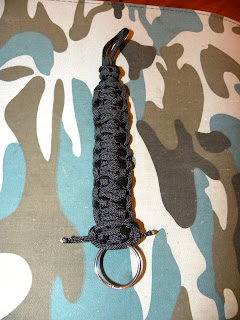
You may have seen the para-cord bracelets, the lanyard is the same sort of thing but can be used to hold keys or something like it till you need to take it apart.

The para-cord bracelet or lanyard is a long piece of 550 para-cord rope that has been braided in a way to make it a small item to carry around. Then when you need a length of rope you unravel it and can do any number of things with it.
The 550 means that it can hold up to 550 pounds. Usually this rope has seven strands inside an outer casing. People who have bought the bracelets have used them for anything from walking a dog or tying the trunk down on a car to a soldier tying up his broken gear while on a sweep or using it to assist in keeping someone from drowning.
Most bracelets you find online are made with about 10 feet of para-cord. The lanyard I am making is made with 12-13 feet of para-cord.
If you don't have time, energy or desire to try to make one yourself, you can check my etsy shop to see about buying one instead.
http://www.etsy.com/shop/CreativeIdeas2Day
Start with 13 feet of 550 para-cord.
Match up the two ends and find the center and mark it. A safety pin through the rope would be most solid but anything that will hold the spot for a few minutes will work.
About two inches down from that middle point make some sort of knot. Whatever type you want or can do will work.

Measure about 5 inches down from the knot and put in some sort of holder. A keyring, a carabiner, whatever you want.

Now it gets a bit confusing.
Lay the whole thing down so that the knot is close to you, the keyring is farthest from you and the cords go up, through and under the keyring then off to the right and left.
Start on your right cord, pull it over so that it crosses over top of your cord (between the knot and ring) and has a small loop remaining on the right side.
Take the left cord and run it over the cord that is coming from the right side. Then behind the main cord and up into the loop on the right side.
Then pull both tightly.


Now do the same again except starting on the left side.
Loop the left cord over to the right. Run the right cord over the cord from the left side, behind the main body and up through the loop on the left side. Pull tight.


Keep doing this until you reach the knot at the other end of the main base cords. For best results, occasionally push your braids up the main cord towards the keyring to fit more in and keep everything tight.

Once you've reached the knot, turn the lanyard around so that the keyring is close to you and start again. This is called a king cobra knot and you'll do this all down the length of the previous cobra knots you have done.


Once you get back to the keyring again, trim any excess cord and using a lighter, burn the ends of the cord so they won't unravel and using something metal, press down the ends. If needed you can tuck extra length into areas of your lanyard so that they aren't hanging loose.
If you have trouble remembering which side to do next, you start with the side that is under the lump on the side. That cord will be the one you loop over to start your next knot.

Now you have 12-13 feel of strong cord that you can easily carry with you at all times.


The para-cord bracelet or lanyard is a long piece of 550 para-cord rope that has been braided in a way to make it a small item to carry around. Then when you need a length of rope you unravel it and can do any number of things with it.
The 550 means that it can hold up to 550 pounds. Usually this rope has seven strands inside an outer casing. People who have bought the bracelets have used them for anything from walking a dog or tying the trunk down on a car to a soldier tying up his broken gear while on a sweep or using it to assist in keeping someone from drowning.
Most bracelets you find online are made with about 10 feet of para-cord. The lanyard I am making is made with 12-13 feet of para-cord.
If you don't have time, energy or desire to try to make one yourself, you can check my etsy shop to see about buying one instead.
http://www.etsy.com/shop/CreativeIdeas2Day
Start with 13 feet of 550 para-cord.
Match up the two ends and find the center and mark it. A safety pin through the rope would be most solid but anything that will hold the spot for a few minutes will work.
About two inches down from that middle point make some sort of knot. Whatever type you want or can do will work.

Measure about 5 inches down from the knot and put in some sort of holder. A keyring, a carabiner, whatever you want.

Now it gets a bit confusing.
Lay the whole thing down so that the knot is close to you, the keyring is farthest from you and the cords go up, through and under the keyring then off to the right and left.
Start on your right cord, pull it over so that it crosses over top of your cord (between the knot and ring) and has a small loop remaining on the right side.
Take the left cord and run it over the cord that is coming from the right side. Then behind the main cord and up into the loop on the right side.
Then pull both tightly.


Now do the same again except starting on the left side.
Loop the left cord over to the right. Run the right cord over the cord from the left side, behind the main body and up through the loop on the left side. Pull tight.


Keep doing this until you reach the knot at the other end of the main base cords. For best results, occasionally push your braids up the main cord towards the keyring to fit more in and keep everything tight.

Once you've reached the knot, turn the lanyard around so that the keyring is close to you and start again. This is called a king cobra knot and you'll do this all down the length of the previous cobra knots you have done.


Once you get back to the keyring again, trim any excess cord and using a lighter, burn the ends of the cord so they won't unravel and using something metal, press down the ends. If needed you can tuck extra length into areas of your lanyard so that they aren't hanging loose.

If you have trouble remembering which side to do next, you start with the side that is under the lump on the side. That cord will be the one you loop over to start your next knot.

Now you have 12-13 feel of strong cord that you can easily carry with you at all times.

Hi, this is my first time here. I'm your new Linky Follower. I'd love if you follow me too :D
ReplyDeleteThanks
Witha @ http://withapinkie.blogspot.com/