Wednesday, February 29, 2012

Easy Cotton Beanie

There is still time to make hats and bags for the current craft hope project that benefits kids battling cancer.

This post is how to make a beanie really quick and easy.

I cut out a rectangle of fabric that measured twelve inches tall by eighteen and one half inches long.

I folded the bottom up twice and sewed straight across to make a brim.
Next I folded in half with pattern together and sewed up the side, leaving the top untouched.

I turned the fabric back right side out. I positioned the side seam to be in the back and accordion folded the top a couple inches down. 

I put a pin through the folds and prepared a needle for hand sewing.
I sewed straight through the folds multiple times to make it stay tight.

Last I used pinking shears to cut strips down from the top, careful not to cut where I sewed down the side.

This would also be great to do with fleece. 

Monday, February 27, 2012

Flower Canopy

I've been working on this off and on for a while now and am so happy to have it finished. And I think it looks awesome!

I have an old round chair that sits in the corner of my library/game room. I decided to make a flower canopy to go over/around the round chair, to create a beautiful "hideout" to curl up with a good book.

I started with a random fairly thin piece of wood. I believe it was a panel on a cheap desk.
I got my Hubby to cut out a circle/hoop for me.
I bought eight yards of tulle from Jo-Ann's and cut it into four pieces that are two yards long.
I folded one end over the hoop just enough to hand sew the tulle around the hoop.


Next I got Hubby to drill four holes around the hoop. He also drilled holes in a small wooden circle that would go up above the hoop.

Using Floral wire I attached the small circle above the hoop. This gives the flower the depth.


I used some paper and did a quick sketch of how I wanted my petals. Cut that out and used it to mark twelve petals in the blue fabric I had on hand that I decided to use for the flower. 

Once I cut out the twelve petals I sewed them to make six finished petals.

I used some green fabric to cut a long strip of fabric to sew to create a tube for the stem on the flower.
I also used pinking shears to cut a strip with leaves to go around the base of the petals.


I pinned the petal stems to the green loop and hand sewed them on. 


Next I hand sewed the leaf strip around the stem, over the base of the petals.

Last I used floral wire (though something thicker would be great) to attach to a hole in the center of the wooden circle and to a hook in the ceiling, and ran the wire through the stem.
 

Friday, February 24, 2012

Deliciocity Friday: Easy Sweet Snack

The hardest part is melting chocolate.
If you have that covered this will be a snap.

Supplies:
Ritz Crackers
Peanut Butter
Melt-able Chocolate

Start with melting the chocolate. Best is to use a double boiler, but if you are going to eat these quickly then just dipping chocolate will work.
If using a double boiler put water into the lower pot, but stop before the water reaches the bottom of the pan or bowl on top. Try to have as tight of a seal as possible, you don't want any water to get to your chocolate. Keep the water on a simmer.

Next spread peanut butter onto a cracker and top with a second cracker. 

Dip in your chocolate.
I held onto one cracker and dipped the other into the chocolate. This covered just one side so I didn't get messy nor did my work surface. 

So simple, yet delicious, filling and cheap.
I have found that they last for at least a little while without making the cracker soggy. However I make no guarantee how long they will last since my hubby gobbled down the few I made as fast as he could!


Wednesday, February 22, 2012

Four Leaf Clover Pin

I know, St Patrick's Day isn't till next month, but oh so often, I blink and suddenly all time has gone. So I'm doing this now instead of suddenly realizing it's the day before St. Patrick's day and I never got around to it.

A quick and fairly easy project. Made from felt and using multiple hearts. I put a pin on the back but a hair clip would work great also.

Start by cutting four hearts out of dark green felt. Mine are only about 1 inch at their widest and one inch tall.
Next cut four smaller hearts out of light green felt.

To attach everything you could use glue, but I opted for hand sewing with light green thread.

Next I cut a really small heart out of the dark green felt and sewed it onto the middle of the four "leaves". 

For the back I used a strip of dark green felt and sewed it over the pin to hold the pin in place.
Be careful that when you are sewing on the back that you only sew to the back dark green leaves, not all the way through to the light green or you'll have random threads all over.

Simple as that!
If you use a hot glue gun it will likely go faster. Regular craft or sewing glue will work also but take longer to dry.
I wanted the threads for mine for the extra pop, so I sewed it.

Monday, February 20, 2012

Fabric Fortune Cookies

So easy but still so cute.

Fabric fortune cookies.
They can be left plain light brown like regular fortune cookies or add any fabric on top.

Start by cutting a circle out of light brown felt.
For best look use something round to trace a circle.

If you are adding a cotton fabric on top then cut that circle slightly smaller and with pinking shears to make the fabric less likely to unravel.
Then sew all around the outside to secure the cotton to the felt.

Now fold the circle in half and sew across the middle of your half circle.
Stop before you reach the outside arch.

Lastly fold the sides of the circle about over towards the line you just sewed.

Now stuff with your own fortune and they never go stale! 

Friday, February 17, 2012

Deliciocity Friday: Sugar Cookies

One of the things I like about this Sugar Cookie recipe is that they are a little sweet but not too sweet. 
 
If you like a little treat then just the cookie is great. If you like more sweet then frosting them takes them that extra step.
 
Ingredients:
1&1/2 C butter
2 C sugar
4 eggs
1 tsp vanilla extract
5 C flour
2 tsp baking powder
1 tsp salt
 
I've made this recipe before with good results but this time I tweaked a few things.
I dropped a couple table spoons of butter and substituted an ounce of cream cheese for each table spoon of butter I left out.
I also added an extra half teaspoon of vanilla extract and about two table spoons of sugar to counteract the tartness of the vanilla.
 
Start by creaming the butter (and cream cheese if you use it) and sugar. Then one by one add in the rest of the wet ingredients.
 
In a separate bowl shift all the dry ingredients and beat into the wet ingredients, one cup at a time.
 
It is best to let the batter sit in the refrigerator for at least an hour, especially if you are going to roll them out and cut them.
It is also possible to just put them by the table spoon full onto a cookie sheet and bake them as little balls. Certainly a possibility once you get tired of rolling and cutting the cookies!
 
Bake the cookies at 400 degrees for 5-8 minutes. This recipe makes 6-7 dozen cookies, which is why you might get sick or rolling and cutting!

 
If you choose to frost the cookies you could use regular store bought frosting or you could make frosting by mixing a cup of powdered sugar with 2-3 tablespoons of milk.  
 

Wednesday, February 15, 2012

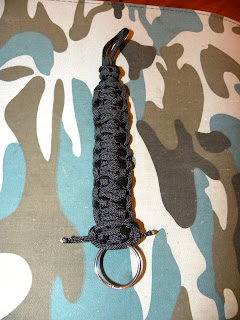
Para-cord Lanyard

You may have seen the para-cord bracelets, the lanyard is the same sort of thing but can be used to hold keys or something like it till you need to take it apart.

The para-cord bracelet or lanyard is a long piece of 550 para-cord rope that has been braided in a way to make it a small item to carry around. Then when you need a length of rope you unravel it and can do any number of things with it.

The 550 means that it can hold up to 550 pounds. Usually this rope has seven strands inside an outer casing. People who have bought the bracelets have used them for anything from walking a dog or tying the trunk down on a car to a soldier tying up his broken gear while on a sweep or using it to assist in keeping someone from drowning. 

Most bracelets you find online are made with about 10 feet of para-cord. The lanyard I am making is made with 12-13 feet of para-cord.

If you don't have time, energy or desire to try to make one yourself, you can check my etsy shop to see about buying one instead.
 http://www.etsy.com/shop/CreativeIdeas2Day

 Start with 13 feet of 550 para-cord. 
Match up the two ends and find the center and mark it. A safety pin through the rope would be most solid but anything that will hold the spot for a few minutes will work.


About two inches down from that middle point make some sort of knot. Whatever type you want or can do will work.

Measure about 5 inches down from the knot and put in some sort of holder. A keyring, a carabiner, whatever you want.


Now it gets a bit confusing.
Lay the whole thing down so that the knot is close to you, the keyring is farthest from you and the cords go up, through and under the keyring then off to the right and left.


Start on your right cord, pull it over so that it crosses over top of your cord (between the knot and ring) and has a small loop remaining on the right side.
Take the left cord and run it over the cord that is coming from the right side. Then behind the main cord and up into the loop on the right side.
Then pull both tightly.


Now do the same again except starting on the left side.
Loop the left cord over to the right. Run the right cord over the cord from the left side, behind the main body and up through the loop on the left side. Pull tight.


Keep doing this until you reach the knot at the other end of the main base cords. For best results, occasionally push your braids up the main cord towards the keyring to fit more in and keep everything tight.


Once you've reached the knot, turn the lanyard around so that the keyring is close to you and start again. This is called a king cobra knot and you'll do this all down the length of the previous cobra knots you have done.


Once you get back to the keyring again, trim any excess cord and using a lighter, burn the ends of the cord so they won't unravel and using something metal, press down the ends. If needed you can tuck extra length into areas of your lanyard so that they aren't hanging loose.


If you have trouble remembering which side to do next, you start with the side that is under the lump on the side. That cord will be the one you loop over to start your next knot.


Now you have 12-13 feel of strong cord that you can easily carry with you at all times.