Friday, June 29, 2012

Black and Blue Smoothie

Do you live in the south?
It is ridiculously hot around here.
So smoothies have become my friend this summer.

This smoothie is simple, sweet and tangy.

I've really stopped measuring when I make smoothies. Just getting it in there to estimation and get it done so I can cool off. So I'll give you my guesstimate. Tweak to your taste.

Ingredients:
(makes two servings)
1 & 1/4 cup frozen blackberries
1/2 cup blueberries
1 cup yogurt
2 Tbsp sugar
1/4 cup orange juice
4-6 ice cubes

So, have you figured out the name?
hehe 
Blackberries and blueberries.
And a bit of orange juice makes this black, blue and yellow like a bruise.
Never knew a bruise could be so tasty!

Put your frozen items in first and crank up the speed so everything gets beaten and blended.

The berries give it sweet, the orange juice gives it a little bite.
If you don't have orange juice a small scoop of frozen concentrate will work. Or a few slices or orange but check that the film on the orange gets destroyed or removed since it won't get up a straw.

How is everyone else getting through this heatwave?

Wednesday, June 27, 2012

Red, White and a Little Blue

In case you hadn't noticed, it's that time when red, white and blue get very common in America.

For Iron Craft we were challenged to make something with some combination of those three colors. 
 At first I came up with an idea that would use red and white gingham.
But I dug through my fabric stash and found none...
Since I'm trying to save and make money I opted to see what else I had.
 I found red fabric with random white polka-dots. 
 My first thought there was it would make a great skirt for a little girl.
No little ones in my life to make for...
Hmmm

Then I had the idea of a bow-tie.
Bow-ties are cool!

So I cut a long thin strip and sewed the sides together then folded it over to make a bow.
I used dark blue ribbon to tie around the center and to hold a strip of red ribbon to the back. 
Added some velcro to the ends and proceeded to harass my cat. :)

Common, that's just cute!

A red with white polka-dots bow-tie on a cat that is black with a couple white spots.

He felt it was pretty stupid but behaved and let me have my photoshoot.
He got a couple treats for his patience so it all worked out.


My first attempt at the bow ended up too small so I made another and made them to be bought. My thoughts were bows for dogs hair (if you want your own dose of cute) but they could work for a human girl also. I made them on ponytail holders.

Friday, June 22, 2012

Deliciocity Friday: S'mores Sticks

I recently came up with this idea because I wanted a snack on these cute appetizer sticks I got and I sometimes get a bit OCD about the crumbs that are created from regular s'mores.

Ingredients:
Mini marshmallows
Meltable chocolate
Graham crackers
Appetizer sticks or toothpicks

I used plastic appetizer sticks with little shapes on the end that matched the symbols and a deck of cards. Great for a game gathering.
I skewered three mini marshmallows on each stick.

Next I used the back of a spoon to crush a couple graham crackers onto a plate. 

I used semi-sweet chocolate chips but the traditional Hersey's bar would work also.
Melt the chocolate. 
I usually use my small double boiler but if you melt in small time increments you could melt your chocolate in the microwave. Just remember that chocolate will sometimes burn in the microwave if cooked too long at once.

Finally I used a spoon to scoop the chocolate over the marshmallows then roll in the graham crackers.

 Then place on a sheet of wax paper till the chocolate cools.

Simple, less messy and if you want to rewarm them, pop in the microwave for a few seconds!     

Monday, June 18, 2012

Made from Pictures

For Iron Craft we had to make something out of a picture.

I finally decided to use glass stones to make a magnet and a pendant.

The bluebells have a magnet on the back.
I covered the picture with mod podge, placed on the back of a glass stone then put mod podge on the back. Last I added a magnetic strip so it can go on the fridge.

The bunny I did the same mod podge treatment then grabbed some aluminum tape my hubby had and used it to hold the metal wire in place and cover the back. 
Duck tape would be another good option.
Just be sure that your metal is well secured so it won't slip out.

The bluebells picture I took here on the property back in April.
The bunny picture I took while walking the trails of the Wildlife Observation area in Hendersonville, TN back in May.


(I know the stones didn't picture too well, curved glass is not the easiest subject)

Friday, June 15, 2012

Deliciocity Friday: FriChik and Noodles

No, not fried chicken, FriChik.
Not a typo.

FriChik is a "fake meat" that I love. 
It's much more healthy then real meats and is so good I'll happily eat it straight from the can.

Find out more about FriChik here.

Besides "as is", I also like making it into a sandwich and makes a main dish called FriChik n noodles.

I've known this recipe longer then I can remember and just make it without much thought but I'll do my best to give instructions you can try.

Ingredients:
Package of noodles
1 Can of FriChik
1 Can mushroom soup
Mayo
Sour cream
Salt

I grew up on the noodles being wide egg noodles but I now usually make it with small shells and personally like that better.

Cook the noodles as described.
While cooking open your can of FriChik and cut or tear into small pieces.

In a large bowl mix the cooked and drained noodles with the FriChik and add in the can of mushroom soup. Next add about a half cup sour cream and about a cup of mayo/salad dressing.
Add salt and any more mayo to taste.

Mix well and serve.

Not that complicated but oh so delicious and creamy!

Wednesday, June 06, 2012

Screen Print Projects

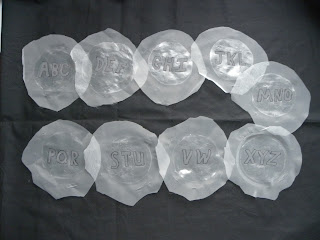
Recently I mentioned making screen print stencils for the Iron Craft alphabet themed challenge.

I wasn't able to make a project with the alphabet stencils before needing to post the stencil project.
Now I've had a little time to work on some projects with the alphabet stencils and I'll also share with you the strain I previously made with a screen print stencil I first made.

I worked on two projects today with the alphabet stencils.
First will be a billfold. 
I have on hand black, red and aqua colored screen print paint. So I decided to use red paint to screen print the word "foxy" onto black fabric.
I lined the letters here to help them pop better on the black fabric.

Why foxy? I don't know, it's what came to mind first and I thought it might look cute on the cover flap of a billfold. (I never guaranteed that my thinking would make sense)
Taped off the other letters that I wasn't using.

I've not quite finished the billfold, it's almost there but it will be a red and black theme. It just seems kind of popping and foxy-ish!

The other project I made with the alphabet stencils is a new phone pouch for myself. 

Tuesday, June 05, 2012

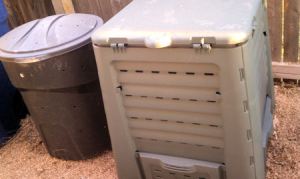
Guest Post: Joining the Compost Revolution Easier than You Thought

Today, I'm breaking from the norm a bit and am participating in the Grow.Swap.Share blog swap. I'm posting over at The Soulicious Life with a recipe for Vegan Fudge. I'd like to welcome Kim from The Soulicious Life, who is here to share some tips for composting. After you've read her post here hop on over to her blog for my post and to read more from Kim about a natural and healthy life!

Joining the Compost Revolution Easier than You Thought

Hi, I'm SoulMomma, a.k.a. Kim, from The Soulicious Life. I hate to waste, I love to garden, and yet I only just started composting. I can't honestly say what took me so long to join the revolution, but now that I'm on board, I'm hooked! Like many people, I was throwing away mad amounts of fruit and vegetable scraps, not to mention egg shells, coffee grinds, and old flowers down the disposal or into the garbage. The reality is that doing so not only takes up unnecessary space in landfills and bogs down water treatment centers, but also wastes rich nutrients that my outdoor plants were craving. Composting is a completely natural process in which organic matter breaks down into rich new soil; just look at the ground in your local woods or favorite trail for proof. Composting at home provides an easy way to turn small amounts of organic matter, including food scraps and yard waste, into "black gold" loved by gardens beds, bushes, and outdoor containers. Composting is surprisingly easy. It simply calls for a designated area in which your household scraps can decompose. It also requires three key ingredients:

Monday, June 04, 2012

Screen Print Alphabet Stencils

Since I was a young teen I've wished I could do screen printing.
Even after they came out with a home machine I still didn't have the large sum of money to get it.

Then I ran across screen printing with Mod Podge...
0.0

I think I first saw it on the Mod Podge Rocks blog.

Since I keep Mod Podge on hand I just needed the fabric, embroidery hoop and screen print ink.
I got the fabric from the remnants area at Jo-Ann's along with the ink. I picked up an old hoop at a thrift store (and since it worked well have picked up a few more sizes since).

I first made a steam engine train stencil and tested it out. When it went well I did the stencil again onto a t-shirt for a friend who does model railroading.

For the past few months I've been thinking I want screen print stencils of the alphabet because I used to write on shirts all the time and if I could screen print instead, it would be awesome!

Since this round of Iron Craft required something with the alphabet I figured it was the perfect time to get to making the screen print alphabet stencils I'd been thinking of.

I first checked to see if I could take the easy way out and buy a stencil like I wanted (then use it to screen print letters onto something for the challenge). 
No such luck.
Couldn't find any screen print alphabet stencils at the stores or online. 
So back to the plan of making my stencils.

I sketched out my letters, then traced them onto the fabric then Mod Podged both sides.
Now I'll use painters tape to cover the extra letters then add the paint.

I've not had the time to use the stencils yet but since I made a train stencil, a morning glory flower stencil and a humming bird stencil previously, I know these stencils should work just fine.

Keep tuned for a future post with an example of the alphabet stencils being used!

Also, come back tomorrow, Tuesday June 5th, for a break from the ordinary with a guest post about composting. It's garden time, get your info tomorrow!

See some projects made with Mod Podge screen print stencils here.

Friday, June 01, 2012

Deliciocity Friday: Peach Smoothie

The summer heat is here.
And I'm wishing I lived in the mountains or somewhere that rarely gets above 70 degrees (F).
 
But since I don't live somewhere with temps that I can stand, I've got to cool off some how.
Cold smoothies to the rescue!
Easy Peach Smoothies
 
Ingredients:
Sliced Peaches (about one peach)
1 & 1/2 cup yogurt 
1/4 cup sugar
Ice Cubes
 
First off, obviously peaches are not always in season. Secondly, I'm allergic to peach fuzz. I've only ever found a couple others who have the same allergy but peach fuzz makes me break out so I avoid it as much as possible.
So I used canned peaches.
I took a large can of peaches and drained most of the juice then put in a bowl in the freezer to freeze the peaches.
 
After the peaches were frozen through I put half of them in a blender. About nine slices or a regular sized can worth of peaches.
 
Next I put one and a half cups of vanilla yogurt on top and blended.
 
Lastly I added 1/4th of a cup of sugar and blended some more. If you don't like things too sweet I'd put less sugar. I felt it needed some but 1/4 would be the top I'd put in the mix.
 
Just those ingredients there made a thick creamy smoothie for two, however you could add a handful or so of ice cubes to thin it a bit more.
Cool and refreshing peach smoothies
 
So simple but every taste of it cries out "cool, delicious summer treat"!
I'll certainly be making this one again soon!