Monday, April 30, 2012

Sleep Eye Masks

I sometimes participate in swaps hosted on Swap-bot.com.
If you miss getting something good in the mail you really should check it out. You sign up to swaps and send to people and get rated based on if you followed the swap or not. 
 
A recent swap I signed up for had all the participants make something that has paws on it. 
I've got multiple fabrics around with paws on them so I had a choice.
 I picked a black flannel with white paw prints and decided to make an eye mask for sleeping.
 
The front is the paw print flannel, the back is a very soft black cotton and inside is a layer of cotton batting. Elastic is used to hold it around the head.
 
While I was making the one for the swap I decided to make another matching one for my shop.
So if you'd like one for yourself go check it out.

I also made an eye mask that is blue with cats sitting on moons.

So if you want to block out the light and help aid better more restful sleep, check my shop for more coming goodies!

Friday, April 27, 2012

Deliciocity Friday: Easy Bread Recipe

My hubby loves bread.
Sometimes if you give him bread and cream cheese he's his perfectly happy.
So I wanted an easy recipe that I could whip up without too much trouble.
This recipe is about as easy as it gets.
 
 
Ingredients:
2 cup warm water
1 package yeast
2 teaspoons salt
2 teaspoons sugar
4 &1/2 cups flour 
(I used all purpose)
 
Start with the warm water in a medium bowl, add the yeast and stir thoroughly. Let sit for a few minutes.
 
Then add the salt and sugar. Next add the flour. I added a half cup at a time, continually mixing. I believe I added four and a half cups. Basically you want the dough a bit sticky but not bad.
 
Cover and let sit. After a little wait mix and kneed the dough some more. Then cover and let sit a little while longer.
 
Preheat over to 450 degrees.
Grease a regular loaf pan (or form into a loaf shape on a flat baking sheet) and place the dough in the pan. 
Bake for approximately 40 minutes.
 
It makes a dense, moist bread that tastes wonderful with a little butter.

 
(Sorry for lack of an after picture of the whole loaf, it smelled too good so I dug in before remembering to take a picture!)

Wednesday, April 25, 2012

Easy Apron

Another round of Craft Hope has started!

This time making aprons for women in Haiti.

Most people in Haiti are fairly poor. Living off just a few dollars a week. There isn't much hope for advancement in their life.
So Craft Hope is working with a woman who has been working with the people of Haiti quite a bit. She will be collecting aprons, long or short, big or small, till the end of May. Then on her next scheduled trip to Haiti, she will take the aprons to the women so that they can have a beautiful and useful new item to brighten their days and bring them hope.
For more info, check out: http://www.facebook.com/events/248132395285524/
Or: http://www.haitibyhand.typepad.com/

So my first apron is an easy half apron that I am sharing with you so if you want to help out others you can make a few and send them on.

All you need is:
 a fat quarter of fabric (measures about 18x22inches)
a second piece of fabric measuring about 7x13inches
sturdy ribbon at least an inch wide
thread
sewing machine or needle

I got my fat quarter from WalMart where they usually are just under a dollar.
If you don't have fabric for the pocket on hand you could get 3-4 pocket pieces out of a second fat quarter.
Fat or flat quarters are at most stores that carry fabric. Or you could buy a half a yard of fabric and have enough for two aprons.

To start you will need to sew a hem onto all sides of the quarter of fabric.
Do this by folding each side over about 1/4th of an inch, then fold again and sew.

Next do the same for your pocket material.
Pin your pocket to your apron, making it as centered and even as possible.
Then sew down both sides and bottom.

I wanted to turn my one big pocket into two smaller ones so I found the center of the pocket and laid down a matching piece of rick rack and sewed down the whole pocket.
I used the rick rack simply for a little extra pretty. If the pocket wasn't a solid color I probably would have left off the trim.

Next is your ribbon for tying the apron.
I cut two pieces that were 21 inches long.
I sewed one end to the top corner of both sides of the apron. Sew over this a couple times since this will get the most stress to it. For the other end I double folded the end and sewed it down so it wouldn't unravel.

I also put a couple little darts in the top of my apron. They are just to make the apron look a little better with hanging on a body, they are not required.
Basically I marked the center of the top of the apron then went an inch out from that mark and folded the fabric under a half an inch and sewed it down.

Real easy!
Less then two dollars spent and just sewed a few straight lines and now I have a pretty and cheerful half apron ready to brighten the day of a woman in Haiti! 

Monday, April 23, 2012

Recycled Butterflies

This round of Iron Craft called for recycling in honor of Earth Day.
Take something that we would normally throw away and use it in a craft.

I made butterflies.


Can you guess what I recycled to make these?

Go ahead, try.

Okay, I'll tell you.

A two litter soda bottle!

After hubby finished off a bottle of A&W I cleaned out the bottle and let it dry.
Then I used an exacto knife to cut out a piece from the side.

I used the natural curve of the bottle to make it look like the wings are flapping.

I outlined the butterfly with puff paint and also used it to make the markings on the butterflies.

Then I used stain glass paint to fill everything in.

For hanging I used a compass (like you use to draw circles) and poked holes into the plastic with the pointed end.
Then ran jewelry wire through both holes and tied so they can hang from suction cup hooks.

Nearly free stain glass butterflies fluttering in your window!

Friday, April 20, 2012

Deliciocity Friday: Unbelievable Banana Bread

Peanut butter cream cheese filled chocolate chip banana bread.

Yeah, I'm going to let you think on that for a moment...

It's like all the best things together in one.

I started with a simple banana bread recipe.
 Then added the filling into a well cut out of the middle of the bread loaf.

Bread Ingredients:
Wet:
1/2 stick butter, softened
2 eggs
  2/3 cup sugar

Dry:
1 1/3 cup all-purpose flour
3/4 teaspoon salt
1/2 teaspoon baking soda
1/4 teaspoon baking powder
1/2 teaspoon cinnamon

Plus:
3 very ripe bananas
1/2 cup chocolate chips

First blend all the wet ingredients with a mixer.
In another bowl mix the dry ingredients then slowly mix them into the wet ingredients.
Lastly fold the mashed bananas and chocolate chips into the batter.

I poured these into well greased little loaf pans and I think baked about 25 minutes. A regular sized loaf pan would probably bake for closer to 50 minutes.
When you stick a clean tooth pick in it should come back out clean.

Once done baking I turned out onto a cooling rack and when cooled I cut into the top to create a well for the filling.

Filling:
8oz cream cheese
1/2 cup powdered sugar
1/4 cup milk
3 tablespoons creamy peanut butter
(peanut butter was a guesstimate based on taste)

Blend all together, you want a slightly thick but creamy filling so adjust the peanut butter for best look and taste.

Pour into the well in the loaf then cut off the top that you cut out and replace.

It is unbelievable how creamy and delicious this turns out!  

Wednesday, April 18, 2012

Picnic Basket Make-over

A little while back I bought a large picnic basket for cheap at a thrift store.
Before

It was fine, but could be more awesome.
After!

I bought some pretty fabric from WalMart, less then a yard was all I needed for this large basket.

I measured the bottom and sides then cut a weird multi-edged piece of fabric.
It's also possible to cut squares for all the sides and sew them together, but be sure to leave extra for seams.

I also cut a piece for the lid and hemmed it.

To attach to the basket I used hot glue.

Since I still had fabric left over I sewed a pouch for silverware. Seven inches wide by twenty one inches long and folded over and hemmed.

I also cut a cream colored wash cloth in half and sewed the green fabric to one side. This created a very absorbent napkin.

Now just need to throw in my green and white table cloth and some food and I'm ready for a picnic! 

Monday, April 16, 2012

Working on the Shop

It is hard to do much when your most used finger is out of commission.

I've been trying to sew, my pointer finger on my right hand just keeps getting in the way.
 Makes things slower but I keep working.

Sunday I created a new project for my etsy shop.
Handmade luggage tags.
My first one is pink and black striped and while I don't much like pink, I love these luggage tags.
I'm going to make some more varieties then put them up in the shop.
So keep checking back!


In the mean time check out some of these other neat shops.

http://www.etsy.com/shop/WildlandCreations
Has great animal pictures that she puts on a number of things.
Tote bags, check book covers and more.
If you are an animal love (if you aren't, what's wrong with you?!) check out this shop.
(I might have to order some things for my yearly charity auction)


http://www.etsy.com/shop/FrogFun
Frogs are cute.
I don't know why.
They just are!
This shop has a photographer take nice quality pictures of frogs in different settings.
Squeeeee!!
Just squeee.
My favorite is this one: http://www.etsy.com/listing/93671520/frog-portrait-photography-of-live-frog
I mean seriously, a railroad spike photographer and a frog. 
It's awesomeness!

http://www.etsy.com/shop/beanforest
Buttons, pin back buttons.
Yeah, I have a thing for those.
Been collecting pins and buttons my whole life just about.
Some in this store are just too awesome.


http://www.etsy.com/shop/agaagg
I've mentioned A Girl and A Glue Gun before.
 Now I'm mentioning her etsy shop.
Her blog is one I check multiple times a week.
Sure her hand warmers may seem out of season but think outside the microwave, and inside the ice box! 
Rice freezes well, I use a rice filled eye mask from the freezer when my sinuses are too swollen.


Also, on my photography facebook page here, I am currently running a giveaway.
Like the page and visit my photography website and tell me which picture is your favorite. You could win a free 8X10 print of your choice! 
But hurry, before the give away ends.


It's much better to spend a little more and get something handmade with care in America (and probably unique) then to save a tad and get some mass produced junk from another country.


(I have not received anything from these shops, I am simply mentioning some neat things to check out on etsy)


Friday, April 13, 2012

Deliciocity Friday: A&W Root Beer Float Cupcakes

I'm still working on getting over my illness from the past week, then yesterday I nearly cut off the end of my pointer finger on my right hand.
As such I'm still a bit out of it and have no use of my most used finger.
So sorry for lateness again and if there are any typing errors.


I'm going to tattle on my husband a bit.
Shhh, don't tell! 
hehe

Before my husband and I started dating, were just barely friends at this time, I had an opportunity to look in his fridge.
The entire contents of his fridge were, multiple bottles of A&W soda...
In his freezer were carton after carton of partially eaten containers of ice cream.
That was it.
Yeah, he had some interesting food habits before we got together! lol (don't get me started)

So suffice to say, if it involves A&W root beer or ice cream, the hubby is happy!
So when I came across a mention of root beer cupcakes I figured I could do something really big and awesome with the idea.

Since I'm a semi-homemade kind of girl I started with a yellow cake batter. 
I made the cake mix as described but where it called for water I used the same amount of A&W root beer. I also used a few drops of root beer flavoring for candies. I often find these little bottles of flavorings at Wal-Mart. Try looking in the craft area if not found in the food aisles.

Next I made a vanilla cream filling. I followed a recipe I found but I have no idea what the creator was thinking, it was way off and I had to edit it a lot. So I'm going to tell you as best as I can remember what I did to make the recipe, forgive me if I'm slightly off and tweak your own to get the right consistency.

Ingredients:
Approx. 1/2 cup flour
1/2 cup milk
1/2 cup butter
1/2 cup sugar
1-2 tsp vanilla extract (to taste)
possibly some powdered sugar for individual preference.

First heat the milk well, microwave will work. Then thoroughly stir in the flour and set aside.

Blend the warmed butter and sugar till well mixed.

Next add the milk mixture to the butter mixture and add the vanilla and beat thoroughly.

To fill the cupcakes, wait till they cool after baking and using a sharp knife, cut a cone from the center of the cupcake. Cut the top of the cupcake off the cone. Fill the well then place the top back on top of the cupcake.

Since the filling is fairly sweet I wanting something not too sweet for the topping. Hubby also happens to love cool whip.
I added the root beer flavor to some cool whip and mixed. I think I added 7 or 8 drops for about one and a half cups of cool whip but add as much as you like for best taste.

I then piped the cool whip on top of the cupcake and added a cherry to top it off. Alternatively, if you have root beer candies you could crush them up and add them on top of your cool whip.

As for verdict. Hubby loves them! I poured him a glass of A&W to drink with the cupcake. He ate the cupcake then took a drink and said the drink actually tasted a bit weak after the cupcakes! 


Wednesday, April 11, 2012

Shower Soap Buddy

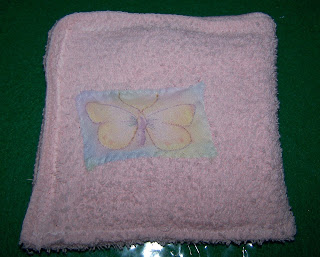
Since I'm still fairly sick I'm going to show you a very easy project I did a while back.

Just a cheap wash cloth and a little sewing and you can solve the problem of slippery soap.

I got a package of wash clothes at the store for a just a couple dollars.

I picked a pretty pink one and decided to dress it up a bit by stitching on a piece of butterfly fabric.

I folded the cloth in half twice, like one normally would to put it away.
I sewed all but one side closed. 
The remaining side I cut velcro to cover the length and sewed it into the opening. 

Now drop a bar of soap into the pocket of the wash cloth and you have soap and cloth all in one.

This is extra great for little ones who don't have much dexterity yet.

Monday, April 09, 2012

Quick Closet Air Freshener

This round of Iron Craft was called "Freshen Up".

The first week I was busy doing this and that. 
The second week I spent all of Monday on set at the taping of the tv show "Nashville" and basically since then have been getting my butt kicked by a nasty sinus infection.
I am seriously surprised I got something created and extra surprised I'm getting in a blog post about it.
(this also explains a bit why not a lot of pictures, I've been very out of it)

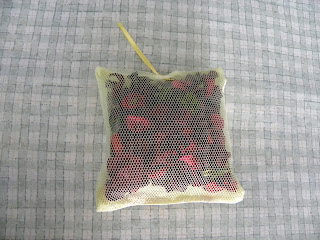
I decided to truly "freshen up" by making a potpourri hanger.

I cut a 5 inch by 5 inch square of fabric.
Then a 5 by 5 inch square of mesh.
Both out of a pretty yellow color.

Then I cut a long, 3 inch wide strip of pink fabric to be a flower.

I hand sewed a simple straight stitch along the long side of the folded over long pink strip.
I pulled the fabric along the stitch to gather the fabric then sewed it onto the solid fabric square.

Next I simply sewed the two squares together and left a hole in the middle of one side.

Turn the fabric right sides out and fill with potpourri.
Then sew closed your opening.
Last sew on a piece of ribbon to hang from.

Ta-da! Bright, fresh, easy and useful!


(seriously, sinus infection, fever, loss of hearing, coughing, sore throat, no voice, this whole thing bites!)
 

Friday, April 06, 2012

Deliciocity Friday: Multi-colored Cupcakes

Another treat I made for the Splatter Paint Party that I posted about previously, is multi-colored cupcakes.

I used a white cake mix because all over online they say to use white for bright colors.
If I did it again I'd ignore everyone and use yellow.
White isn't as flavorful as yellow and yellow would make stronger colors with less dye added.

Ingredients:
Boxed cake mix
Ingredients listed on box
Multiple small bowls
Food coloring

I also made a filling that while looked awfully runny ended up working fine after sitting in the cupcake for a bit.

I made the mix as directed except didn't beat for quite as long as directed because you have to mix more to add the dye and you don't want to over mix.

Once mixed I scooped the batter into multiple bowls. I did just the four base colors in an average food dye box so put some batter into three other bowls.

I added dye to each bowl then carefully hand mixed it in. Probably at least 5-6 drops per bowl.

Then using a tablespoon I scooped one scoop at a time into cupcake liners. I alternated different colors so that they weren't all alike. 


Then baked.

Filling:
4 oz Cream Cheese
1/4 cup powdered sugar
1/8 cup milk

After the cupcakes had baked and cooled I used a sharp knife to cut a cone out of the top of the cupcake. 
I mixed the filling well then scooped it into the well.
I cut the top off the cone and placed the top back onto the cupcake.
(the insides you get to eat!)

For the frosting I used gel food coloring by Wilton and a paint brush to brush the color thickly onto the inside of a piping bag.
Then filled with white frosting and added my frosting tip.
You'll need to squeeze some frosting out to get it to go from solid white to multi-colored.
(pst, squeeze it onto the cupcake centers you cut out then eat later!)

Forewarning, there is a strong chance that all this coloring will color your tongue. 
Not great for office lunch but really great if you're a kid at heart and enjoy that sort of thing!

Happy Eating!  

P.S. Just had to share with you the kitchen helper I often have. 

Sure he doesn't keep me from messing up but he does cheer me on with a happy meow throughout my baking! :)

Wednesday, April 04, 2012

Decorating: Glow Star Stickers

Have you seen those glow in the dark star shaped stickers?

The ones that you can stick to your ceiling and make it so that you can sleep under a starry night sky every night.

There are a few problems with those stickers.
1) If you have what's referred to as "popcorn ceiling" (little bumps all over) aka lazy way out ceiling, then the stickers won't stick.
2) If you move, say good bye to those stickers, they don't move easily.

Many years ago I can up with a solution on how to use those stickers despite the issues.

A $1.00 (maybe $2.00 depending on where you get it) solution.

I went to the dollar store and bought a black plastic table cloth.

Now these may be only in dollar stores around Halloween time. However if you go to party supply stores they will usually have them year around for a little more then dollar store costs.

Using thumb tacks I pinned the table cloth to my ceiling over my bed and stuck the stickers to it.

since I came up with this idea I have moved nine times. Some houses had popcorn ceilings, some didn't. 
The table cloth made the stars easily transportable and that one dollar table cloth has lasted 10+ years.

So if your kids have been wanting the stars over their beds but you've been unwilling or unable to accommodate them, now you can!
Or if you are an adult (like me) who just loves looking at the stars you can have them every night, minus the threat of a raccoon or skunk joining you in your sleeping bag!