Friday, March 30, 2012

Deliciocity Friday- Multi-Colored Rice Krispies

Earlier I posted about the Splatter Paint Party I hosted.
In that post, here, I mentioned that one of my foods was multi-colored Rice Krispies.

These are pretty easy to make and the extra color makes them more fun.

Ingredients:
1/4 cup (half a stick) of butter
7oz container of marshmallow fluff
4 cups rice puff cereal
1 Tbsp dry cake batter
Multi-colored sprinkles

Start by melting your butter in a small sauce pan over low heat.

Add the entire container of fluff.

And 1 tablespoon of cake batter straight from the box. I used white but I'd suggest yellow.
Also, ignore that my measuring spoon says 3 tablespoons, my measuring spoon actually has a typo.

 Mix thoroughly, then pour in cereal, and mix more till fully combined.

Last, sprinkle on your sprinkles, as much as you want and mix enough to get them spread out.

Grease an eight by eight baking dish.
I used cooking spray but covering with vegetable oil would work as should lining the dish with wax paper.

Let cool then cut with a butter knife.

Wednesday, March 28, 2012

Splatter Paint Party

Certainly one of the most fun and hilarious parties I have organized.

A splatter paint party.
Me threatening my hubby

The whole goal of the party is to make a mess.
As kids we're told not to make a mess. As adults we don't want to make a mess because we know we'll have to clean it up.

This is outside and utilizes throw away stuff to protect surfaces and minimize clean up.
Must hold outside in an open area

Some of my friends and I got together and brought some acrylic paints and flung the paint everywhere.
Afterwards with paint everywhere!

I bought white poster board and cut them in half to create two large blank canvases out of one poster board.
 I put a cheap throw away table cloth over the table then taped the boards down to it.

To hold the paint I used paper cups and cut them down to small wells. I squeezed one full color into each cup.

We each wore junk clothes that we didn't mind getting painted. Also had goggles or shower caps for those that wanted them.
Dribbling paint over the canvases

To paint we simply dipped our fingers into the paint and went after our boards.
Once our boards were covered we went after each other! 
That was kind of more fun then painting our boards!
David and I doing the hand flailing "girl fight" while Tasha tries to get away
Paint fling!

Results of the fling. So, what does orange sound like?

As for food:
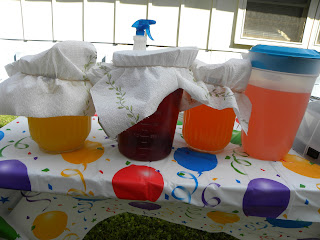
I got four different colors of cool-aid.
Literally the flavor was less important to me then the color.
I wanted everything to hold as much color as possible!
I served them in clear cups to show off the colors. 
Each pitcher had the flavor ripped from the package and taped to the side of the pitcher so it was each to know what you were getting into.
Had to keep bugs out of stuff

I also made multi-colored rice krispie treats.
Recipe in a future post

For a little more color I filled a bowl with M&M's.
M&M's are always a winner!
 
And multi-colored cupcakes with multi-colored frosting.
Recipe in a future post


Both the paint table and the food table had a dollar store table cloth that had balloons on it. 

And of course it's not a party without balloons and/or streamers.
I tied these loosely around the tree branches so that I could easily snip them off with scissors later.
Balloons and streamers, a party must have!

After throwing paint everywhere we all went inside and showered then ate the colorful junk food, then played a couple board games to wind back down while our paintings dried.
The master pieces. Tasha, Jared, David, Group colab and Clarence are the artists

My artwork

It was so much fun and something we all want to do again sometime.

Monday, March 26, 2012

Peeps Pinata

This round of Iron Craft required the use of something Peeps.
Those over sugared squish balls that I'm told are edible.
(can you tell I'm not a fan of Peeps?!)

So my thought was destruction.

I created a pink bunny Peep pinata.

I mixed regular school glue and a little water then covered newspaper with the mixture.
The newspaper wrapped around two balloons I blew up.

I used two toilet paper rolls with the ends filled with a little newspaper and papered them and attached to the top of the smaller of the two balloons. This created the ears.

Once all was well covered and dry I used an exacto knife to cut off the tips of both balloons (where they blew up). 
After removing the balloon remains I used some tape to lightly attach the two openings together then put a couple layers of paper over that to create a solid sturdy neck.

After everything dried I used the exacto knife to cut a flap out of the back and pour candy into.
I used a little more tape and paper to secure the flap closed.

Next I spray painted the whole thing white, let that dry, then spray painted pink.


Last I cut tissue paper into strips and cut fringe into one side of the strips then painted a bit of glue onto the other side. I attached the strips starting at the bottom and going all the way up.


For the face I took a stencil paint brush (round and flat tip) and dipped it in brown paint then patted on the round eyes and half circle nose.

Now I can beat up a Peep! :)


Friday, March 23, 2012

Deliciocity Friday: Blueberry Sorbet

Difference between sherbet and sorbet?
Sherbet is allowed 1 or 2 percent dairy content.
(Ice cream must have at least 10% dairy)
While sorbet is dairy free.

This makes a delicious treat to cool off with (what is with these summer temps at the end of winter!?) without being overly fattening.

Ingredients:
3 cups blueberries
1/2 cup water
3 tbsp honey
2 tbsp lemon juice
1/8 tsp salt
a little lemon zest

This makes about 2 and 1/2 to 3 cups of end product, or about 3-4 small treats.

Blueberries can be fresh or frozen but if frozen allow to thaw some.

If you don't have a lemon zester (raises hand) you can still get some zest.
One option is lightly grate with a small holed cheese grater. 
Another option is to lightly rake the tines of a fork back and forth, and up and down along the outside edge of the lemon (carefully, you don't want the white part of the lemon). Then use the side of the fork to scrape it off the lemon and into your blender.

Put all the ingredients into a blender and mix well. 
When you think it's mixed well enough, mix some more because the blueberries have "shells" that need to be cut up very small.


Now pour into a freezable container and freeze for an hour, then mix well and freeze again till solid. Leave it out of the freezer for a couple minutes before serving.

Of course this can be done mostly the same with any other fruits besides blueberries, that's just what I had on hand.


 Pst, have the kids leave the room. I'll wait.

Oh and if you have any adults with kid tastes (overly picky) have them leave too.


Okay, I've got a secret for you.

This treat is actually pretty good for you!
Blueberries have all kinds of antioxidants and other health benefits.
Lemons have vitamins and such.
Since using honey instead of processed sugars you avoid a lot of the unhealthy junk that companies put into everything.
Also since there is no dairy or other animal products it is vegan too.
So enjoy a cool treat without the guilt and without the worry of what you are giving to your kids!  

Wednesday, March 21, 2012

Decorating: Little Shelves

Most of the time shelves are pretty wide.
Intended for books, framed pictures, clocks, etc.
But what about the little stuff?
Like rubber duckies?

Don't forget the duckies!

Last year we repainted some rooms and redid the floors. This required the base boards to be ripped up. 
Some didn't survive too well.

So we cut off the messed up parts and painted them and prepared them to be shelves.

Home Depot has packages of little (one and a half to two inch) L brackets.
 We screwed the brackets onto what was the front of the base board then screwed the other side into the wall. This put the back of the base board facing up towards the ceiling.

Now add your little items. 
Since most little items are light there is not a lot of worry about being strong enough.

I have shelves in my bathroom to hold rubber ducks (need to add more).
A short shelf in the bathroom to hold stuff for guests taking a shower. Extra toothbrush, soaps, little lotions, etc.

I'm soon going to put up another one in my craft room to hold the baseball memorabilia we have and maybe some of my paintings.

Monday, March 19, 2012

One Hat, Four Looks

Last round of Iron Craft was about making something all of mostly from the Dollar Store.
I made and submitted the After Bath Wrap

But I didn't stop there.
I also dressed up a hat I got at the dollar store.

Some supplies were dollar store, many of the extras were not dollar store (which is why this was secondary to the bath wrap).

With some fabric, lace, buttons and velcro I turned a plain hat into a multi-look hat.

This would be really great for traveling since with just a little space you can have four different hats!

For one look I wrapped ribbon around the brim of the hat then made a fabric flower for where the ribbon crossed and used a button for the center of the flower.
This is made with one long strip of fabric and a straight stitch that is then gathered creating a circle.

For the second look I made a four petal fabric flower with a button center.
This flower is created by cutting out circles, folding them over and sewing the ends together.

Third look is lace bunched around in a circle with a red ribbon bow center.

Last look has sheer and satin ribbon into a large bow with a fake flower and pearl bead in the center.

The hat has a soft piece of velcro attached to the brim. Each decoration has a rough piece of velcro attached to the back of it.
The end result is easily removed decorations that wont destroy the hat or fall off easily. And the hat can look fun and beach ready or elegant and nice!


Sunday, March 18, 2012

Here and There

If you are into sewing I am currently hosting an I-spy fabric square swap on Swap-bot.com. You have till March 26th to sign up. Even if you are not up to making an I-spy quilt you could use them to make a bag, cover a notebook, etc.
Swap-bot is free to join and you can swap anything from emails to large packages with people all around the world. You get rated and rate on each swap you are in so it cuts down on people not following through.

Like the page and get post links on your fb wall!

Want some of the things I make here but are unable or unwilling to make them yourself? Or need a unique gift that you know the recipient won't already have? Check out my Etsy page here: http://www.etsy.com/shop/CreativeIdeas2Day

See you around the net!

Friday, March 16, 2012

Deliciocity Friday: Pi Day Pie

This past Wednesday was Pi day.

Think back to math class, skip over the horrible memories of bad grades and go straight to that weird wavy table looking symbol.
The one that was supposed to help you figure out the circumference of a circle. 
Pi=3.14 (and it goes on and on)

So March fourteenth, 3/14 is pi day.
How best to celebrate pi day?
With pie of course!!
Math never tasted so good!
 (don't ask me the circumference of my pie, I did good to remember the 3.14 bit!)

I like pie once in a while.
My hubby loves pie. His statement is; "I only like two types of pie. Hot pie and cold pie!"
So of course it made his geeky, sweet loving day that I made apple pie for pi day!

Now I cheated and used a can of apple pie filling (though added some extras to it) but I made a crust from scratch that was awesome! (and fairly easy)

Ingredients:
2 and 1/2 cup all purpose flour
2 sticks butter or margarine
1 tbsp sugar
8 tbsp cold water

Have your butter be very cold, I took one straight from my fridge, the other stick just a couple minutes out of the freezer.

Put the flour in a medium sized bowl and cut the butter into slices and add to flour. Use a pastry cutter or strong fork to cut the butter into the flour.
Add the sugar and cold water and mix.

Put out onto a flat surface and using the palm of your hand mush the flour together and into a ball.
Separate into two equal sized balls and set one aside.

Roll out the first ball till about 1/8 to 1/4 inch thick and place in bottom of a pie pan.
 Pinch the edges up around the top of the pan. Use a fork to poke the crust all around.

Add your filling then roll out the second ball to same thickness and place over top the pie.
Pinch the edges with the bottom crust edges then use your fork to crimp the edges.
 Poke a few vent holes into the top of your crust.

Bake at 425 degrees for 15 minutes then at 350 degrees for 40 minutes.
(You may want a flat baking sheet on the shelf below your pie so that if the filling bubbles up and out it will hit your sheet, not the oven floor. It's easier to clean up that way)

I know I did a few things different then most recipes will tell you.
Most recipes for pie crust say use unsalted butter and add salt. I used regular salted margarine.
Most crust recipes says refridge the dough for at least an hour after working it into a ball. The closest I did to that was place a couple ice packs under the glass cutting board I was using and let it sit for a couple minutes before rolling.

Even breaking some common pie crust rules, this was one of the best crusts I ever had!
I took it out of the oven as soon as the 40 minutes was up and the crust didn't burn and get horribly dry like many do.
It was flaky yet moist.
Sweet but just barely.
Absolutely delicious!

I apologize for there not being many pictures but most of pie making is messy and there was no way I was going to pick up my camera with my nasty hands!   


Wednesday, March 14, 2012

The Least of These

Today is not a craft post.
Why?
Because instead of crafting Sunday I joined a local mission opportunity called God In Shoes.
 
God In Shoes organizes women to go out into their community and spread God's love by serving other women.
They give manicures, pedicures, spa pampering, hair cuts, massages, etc. Then leave the ladies with a gift bag with things like flip flops, slippers, lotions, towels and more.
 
It's not about pressing the women to talk about God or accept Him, it's about giving the love that we know Jesus would.
Matthew 25:40 - "The King will reply, 'I tell you the truth, whatever you did for one of the least of these brothers of mine, you did for me.' "
 
This was my third year helping out with God In Shoes and I always enjoy it. I'm there to give to others but I too receive a blessing. 
 
God In Shoes goes out to retirement communities and women's shelters. Some of the women we serve have been abused by men, some have lead a rough life, some just have not been the recipient of love and care in a long time, if ever.
Many of us go get our nails done, go to the salon, buy a new pair of shoes, without a second thought. Many of those we serve are unable to even think of doing that sort of thing.
 
The last two years I have gone to a retirement home and given manicures to the ladies. One lady I met was in her 90's and a joy to chat with while I did her nails. Others have stated to me that in their 60-70 or more years of life they have never had a manicure. 
 
A question I often get asked is if I give manicures for a living. The answer is no, I do my own nails a couple times a year and I've been doing manicures for God In Shoes, one day a year for the last two years. No training, just a willingness to serve others.
 
You don't have to go to far away places to spread God's love.
You don't have to be an amazing speaker to spread God's love.
In fact, if you are only ever going far away to minister then you are neglecting the need that is right around you all the time.
There is an old saying that goes: "Spread God's message ceaselessly, and if necessary, use words."
 
As much as you think your life may be bad, there are always those who have it worse and you don't have to be rich to help others. I'm usually doing good to get by but I've volunteered my time many times in many ways.
 
Search for a local shelter or retirement home and ask if there is anything you can do to help. Work with your church to organize something, maybe even your own branch of God In Shoes.
 
Just a little of your time can go a long way towards sharing God's love.
There is a song called "Light Your World" by Newsong:
"Light your world
Let the love of God shine through
In the little things you do
Light your world
And though your light may be
Reaching only two or three
Light your world"
 
"whatever you did for one of the least of these, you did for me"
Don't think you have to be rich or go far away or be a word smith, you only have to be willing to humble yourself and share God's love. 


In the end, you may be just as blessed as those you serve!
The women getting ready to go out to serve

Spa treatment at the retirement home

Me on the left, giving manicures