Monday, January 30, 2012

In the Works

Been very busy.
Running errands.
Housework.
Fascinating things...
Got a couple big projects in the works.
But nothing completed just yet.
A couple sneak peaks:


So, guesses?
hehe
Until then, for craft ideas, check out:
Kimbo at A Girl And A Glue Gun
http://kimboscrafts.blogspot.com/
She is often up to some neat crafting stuff.

Or check out:
Making Memories blog
http://makingmemorieswithyourkids.blogspot.com/
She has some great food ideas, for kids or everyone.

Both of those are great blogs that update often.
But don't be gone too long! I'll be posting some very good stuff soon!

Friday, January 27, 2012

Homemade Fried Rice, Deliciocity Friday

First off I let me take a moment to mention menu planning.
I never thought it would work for me. I'm a spur of the moment type person. Every time I read a blog about planning menus for the month I skimmed it but knew I wouldn't be doing that. I base my meals on my mood, time and the weather that day.
But at the beginning of this year I bought a little note pad that included a shopping list and places to plan a menu out by the week. 
I figured worst that happens is I just use the shopping list part.
But I've got to say, I'm actually enjoying the menu planning!
Yes I have to spend some time one night thinking of what to have but in many ways it actually frees up time, makes it easier and less brain hurt every day. 
One night near the end of the week I come up with meals for the next week, write on the shopping list what I need then in the morning I glance at the days menu and do any prep I need or see about when I'll need to start the meal to get it ready on time. 
This has also allowed me to think up things I've not tried before or in a long time.
That is actually how I came to make this dish the other day. I created it years ago but have forgotten it for about a year now.
Sometimes I have a craving for oriental type food but can't eat out all the time, so I decided to create a good replacement for fried rice. As a plus, this can be cooked all in one frying pan, just in stages.

You'll need: (feeds about 2 depending on appetite)
1 Box rice (such as rice-a-roni)
Butter called for in the rice
2 eggs
Veggies of choice, frozen works great, I like corn but peas and carrots are common
Onions are optional

If you are going to have a meat in your rice (like chicken fried rice) then you'll need to cook that first. Fry it in the pan then set aside and scrape the pan clean.

Start with scrambling your eggs, add seasonings and cook through. Then set aside and scrap pan clean.

If you are cooking fresh onions you'll also want to sauté those before starting on the rice.
Finally, prepare the rice as described on the box.
I like to either used chicken or oriental flavored rice.
About five minutes before the rice is supposed to be done, add your frozen vegetables, stir thoroughly and allow to finish cooking.
When rice is done or nearly so, dump back in all the items you previously cooked (meat, eggs, onions, though only the eggs are required, the rest is taste preference) and allow to cook for another couple minutes. Just needs long enough to bring the heat of the extra items back up to the temperature of the rice.

Serve!
It's not exactly like what you get at a restaurant but it's a delicious substitute and much kinder on the wallet then ordering take out all the time!

Wednesday, January 25, 2012

Easy and Inexpensive Drawstring Backpack

Have you heard of Craft Hope?
Because you should check it out!

They encourage crafters from all over the world to help with their newest project, by making something in the theme and sending it to one person who collects everything and then gives them to people in need.
Last round was sock monkeys to go to burn victims.
I tried, I really did.
Have you ever argued with an unfinished sock monkey that just wasn't going as hoped?...

Anyway! :) This round is about making hats and bags for kids who are fighting cancer. 
Read more about it, here

So as one who makes all her own purses, has made purses and bags for others and to sell and made soft hats to sell, and has known many people who have battled cancer, you know I'm on this one!
So don't be surprised if some of my posts in the near future have to do with projects that would be good for this round of Craft Hope.
The deadline to send these items for the kids is Monday March 12, 2012 so if you want to join in, you've got time to work some creations into your crafting schedule.

Even if you aren't the most capable at sewing you can still help out. 
The following is a "how to" for making a very easy and inexpensive drawstring backpack that is big enough for the recipient kid to take coloring books, notebooks, or a teddy and small blanket with them on their next trip to the hospital.

Made with a couple flat quarters (if you are unfamiliar, that is a sewing term for fabric that measures about 18 inches by 22 inches, or about a quarter of a yard of fabric) and some ribbon, this bag could cost you well under $5.00 easily. 
(I usually buy my flat quarters either on sale or at Wal-Mart, costing about .99 cents each. The ribbon I used, one spool costs at most .50 cents, the other $1.00 and I didn't use all of either)
If you want a thicker bag you could line it with more fabric or use four flat quarters, two for each side.


Start with two flat quarters, or two pieces of fabric measuring about 18 inches wide by 22 inches tall. I actually used a flat quarter laid out on top of the fabric I wanted to use and used the FQ as an easy template to cut around.

You'll also need some ribbon.
I used some thin dark blue satin ribbon for the closure and wider medium blue grosgrain ribbon for the arm straps. And of course you'll need thread and either a needle to hand sew or a machine to make it faster.
I first folded the top edge of one of the long sides in for about 2 inches down. I did this on all four top corners.

Next I folded the top down towards the "wrong" side of the fabric, about a quarter inch then folded again about three quarters of an inch. Then sewed straight across. This created a roll where the closing ribbon can be run.

Once both pieces have the casing sewn on top, match the "right" (printed) sides together and sew the three other edges. Stop just short of closing up the casing you made for the ribbon.
If your fabric is prone to fraying, you have two options. Use Fray Check or something like it, put on all three sides you just sewed. Or instead of sewing right sides together, first sew wrong sides together, turn inside out and sew the same area again, then turn back right side out. This encloses your seem and stops the frays.

Now for the ribbon.
I cut two pieces 25 inches long of the thin ribbon for the drawstring and two pieces about 26 inches long of the grosgrain for the straps. 
For the straps I folded the ends of the ribbon over about half an inch and sewed at the bottom corner and at the top corner just under the casing for the drawstring. I sewed the ribbon over and over on each end so it has multiple layers to help it withstand being used.

For the drawstring I ran the ribbon through the casing using a tool just for that but simply attaching a safety pin to the ribbon will help you run it through.
Tie the two ribbons together in a simple knot at each end. These can be pulled and tied together to close the bag.

That is all!
However (hey it's not a "but"!) if you used a plain fabric with no design like I did, you may want to embellish the front in some way.  If you used a decorative fabric you may like it just as is.
Most decorations would be best if added before you sew the two main pieces together.
I created a simple front pocket by taking another fat quarter and cutting out a piece that measured 8 inches by 10 inches.
I double folded the top and sewed then sewed the sides and bottom after folding them over once. Then sewed it onto the front of the bag.
You could also embellish with iron on transfers, buttons, etc.

I wanted to keep this one as gender neutral as possible. The blue makes it boy friendly but most of it is a bright pretty blue that some girls will love also. Other bags I'll make more girl or boy defined but I wanted one that could easily be given to whoever was in need.

So for just a couple dollars and the knowledge of how to sew a vaguely straight line, you have a great backpack, ready for a young kid. In this case, ready to brighten the day of a young warrior battling cancer!

The bag being modeled by a large bunny I have as a prop for my photography business:


Monday, January 23, 2012

Bookmarks

Today's post is later then usual for two reasons.
1) Yesterday, after a little over three years of service, my netbook decided it was done... 
A moment of saddened silence...

I know it's just a computer but it was great for me. I'm now borrowing Hubby's laptop, it is so not the same.
2) Last night some very strong storms came through. Since I didn't go to sleep before they started, I stayed awake till after they were done. At 2am...
So naturally, I slept in this morning.
Anyway, without further ado, today's post:

I don't know why but I have the hardest time keeping track of my bookmarks.
I finish a book, I lay the bookmark down where I was last reading, I return later for it and it's no where to be found.
My husband never reads so I know he isn't borrowing them. They just disappear.
I've bought bookmarks, I've been given bookmarks, I use receipts or anything that is near. But nothing sticks around. 
The best luck I've had was with my two of hearts from a deck of cards. 
("the two of hearts to mark her place, and who could ever walk away, from chapter twenty one, so she can't be really gone" name that song, hehe)

So recently I decided to make a few different bookmarks. Some for gifts, some to have all over and up my chances of finding one when I need them.


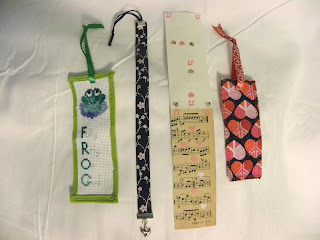
The first one was a cross stitch I did.
I cut a cross stitch fabric piece about 6 inches long and 2 inches wide. I cross stitched a sitting frog, the initials F.R.O.G. for the words "Fully Rely On God". I then covered the back with a simple green fabric, that folds around to the front, and finished with a green ribbon.

The second one is a ribbon bookmark. I cut a strip of ribbon long enough to go through most books and using bookmark clasps added a thin ribbon on top and a dove charm on the bottom.

The third bookmark is paper. I cut a two and a half inch wide strip from the side of a piece of card stock paper. I folded that in half and covered the front with a piece of old sheet music. I used shaped hole punches to add the shapes on front and back. I also cut a small strip of magnet off a roll and put a piece on both insides to create a magnetized bookmark that will hold a book page.

The last one is made of fabric. I cut two pieces about 5 inches long and 2 and 1/4 inches wide. I used a fancy setting on my sewing machine to do a serger effect around the outsides. Alternatively you could sew normally and use a fray check to stop the fabric from fraying. This one has two different heart fabrics for front and back so I used a heart decorated ribbon to finish it off.  


This shows a few different options for creating bookmarks that won't cost much at all. The cross stitch one takes some time but all the others are fairly quick to make. So if you often loose your bookmarks like I do, whip up a few and stash them around the house. Maybe then you can throw out that grocery receipt instead of using it as a bookmark!

Friday, January 20, 2012

Easy Pizza Bites - Deliciocity Friday

I created this dish that is awesome in so many ways.
Homemade pizza bites.
Reasons why it rocks:
1) Homemade means cheaper, aka budget friendly.
2)Filling, their size makes them great for a snack but eating a few more can turn it into a full meal.
3)The dough is made from packaged biscuits, this makes it quick and easy and takes out the problem of active yeast. If you've ever eaten pizza then suffered all night from upset stomach, that was probably caused by the yeast being too active still when you ate it.
4) There is something about bite sized food that is cute and fun.
5) They can be frozen for later (extra score!!)

Ingredients:
Packaged biscuits
Pizza Sauce
Toppings of choice

Also need a muffin pan and I'd advise cooking spray.
I started by spraying my muffin pan with cooking spray to help release the mini pizzas.
Next I opened my can of biscuits and tore them in half. I then proceeded to use my hands to flatten down the half a biscuit and shape into a round shape.

Then place in the muffin pan holes. 
You might be able to tear the biscuits into fourths and shape to fill the bottom of the holes. This may be able to still fill the space but not rise as much, therefore making them more snack-able.
Then spoon just a small amount of pizza sauce and add your toppings.

Place in the oven. I followed the directions on the biscuit can and pre-heated the oven to 375 degrees and checked them every five minutes to see how long they needed to cook. After about ten minutes they were cooked through the biscuit and ready to be removed.
I ran a butter knife around the edge of the pan and slid them right out.

Afterwards I had three left over so I slipped them in a ziplock sandwich bag and froze overnight. The next morning I took them from the freezer, placed them on a paper plate and heated for 30 second intervals. After a minute and a half they were warm and ready to eat, and showed very little loss from having been frozen.

I don't know how long they can still be good in the freezer but as delicious and easy as they are I don't see them lasting very long anyway.
Next I'm going to make up a bunch just to store in the freezer. They'll make a great little breakfast or something easy for hubby to grab and eat when he passes through on one job or another.

Wednesday, January 18, 2012

Fifty-six Hearts Later...

And you have a banner!


I noticed some really pretty Valentine's/heart themed fabrics around and bought a few inches of some. 
Then I looked at my heart themed fabrics in my stash at home and realized just how many options I already had!
I decided to cut out two hearts of each pattern fabric and picked out four solid fabrics and cut out enough hearts to sew onto the back of the patterned hearts. 
I traced the hearts using a small heart shaped box to get uniform hearts, then cut with pinking shears.
Matched the fabrics, cut out twenty-eight pieces of light pink, thin satin ribbon at four inches long.
 Sewed the hearts wrong sides together and sewed the ribbon at the same time. 
I then used a darker pink shear ribbon (about an inch wide) and pinned a heart to dangle every four inches, doubling over the satin ribbon. I then sewed down the entire length of the dark shear ribbon. 
 
Ready to hang! 
56 hearts total (28 back to back), more than 9 feet of thin pink satin ribbon, around 10 feet of pink shear ribbon, some thread and a good chunk of time. 
I love how it turned out.
(and I was amazed at just how many heart themed fabrics I have) 
Took pictures of the hearts four at a time so you can see the different patterns and how it looks.


This post brought to you by the fact that bills like SOPA and PIPA have not yet been passed. http://sopastrike.com/

Monday, January 16, 2012

Let it Snow!

Last week we actually got a bit of snow!  
Sadly, snow doesn't happen too much in middle Tennessee.
 
I love snow though so I love decorating each winter with snow, snowmen, snow flakes, etc.
A recent creation of mine is a framed "Let it Snow" snowman/snowball picture.
 
I bought a plain black frame with white border at the dollar store. I made certain to get one where the glass was a little off the back of the frame. Space is needed for the snowmen.
I also bought small Styrofoam balls at Michaels, that I used an exacto knife to slice in half.
All other items I had on hand.
 
I used black puff paint to dot on eyes and coal mouthes and orange puff paint for the carrot noses.
I used a piece of old music sheet (same as from the "music love" and "paper butterfly" projects) to fit behind the white border.
 
Once the snowballs were done drying I arranged them around the frame under the glass and once I found a design I liked I glued them to the paper and border. Using a simple sharpie marker I wrote around the border; "LET IT SNOW!"
 
And done! All those happy faces make me want to smile also!  

Friday, January 13, 2012

Deliciocity of the Day 1-13-12

There was a sit down restaurant that had an appetizer that was cooked cabbage (and other stuff) in a tortilla roll.
No I'm not avoiding using the restaurant name, I just don't remember which one it was.

Here's how to do a delicious and cheap knock-off at home.

Ingredients:
Head of cabbage
Can whole kernel corn
Can black beans
Tortilla shells
Grilled chicken
Cheese
Garlic
Worcestershire sauce

Grill the chicken in a pan on the stove. It doesn't have to be much chicken and can be skipped and still taste fine. Chop into bite sized pieces and set aside.

Start by chopping the head of lettuce into cubes, or something like it. Alternatively, you can make things easier by using a bag of coleslaw mix (that also may add carrot shreds to your dish, score for more healthy stuff).
Put cabbage into large frying pan on medium heat, add garlic and Worcestershire sauce. Amount is based on your taste. Likewise you can add a dash of salt or season-all salt to heighten the flavor. If you like onions you can chop some finely and add it or use onion powder or dried onions. Onions are not necessary but add a little extra flavor and more healthy stuff.

Cover the cabbage and let cook till wilted, stirring occasionally. 
When the cabbage is nearly done (should be soft, not crisp anymore) open and drain the corn and beans and add to the cabbage. Add cooked chicken to mixture and stir well while allowing the new ingredients to heat up.

Warm your tortilla shells, either for a moment in a warm oven or a few seconds in the microwave. Sprinkle a little shredded cheese on the shell and scoop the cabbage mixture on top. Sprinkle a little more cheese then fold closed. Sliced cheese is also great for this for a more creamy flavor.

Probably under $5.00 when you figure it all up and makes easily five to six or even more (depending on size of cabbage head) large tortilla rolls. 

Not too much work, especially if you skip the cabbage head and use coleslaw mix, tastes great and has all sorts of healthy, good for you stuff (but no one has to tell the kids that!).

Wednesday, January 11, 2012

I dyed a little today...

And now I have weirdly blackish hands.

I bought a second-hand pair of jeans a while back that had been pre-faded to gray (at no extra charge!).
They looked alright but when wearing a black shirt the jeans just look bad.


So I dyed my jeans, then had the idea to dye the end of one of my husband's shirts.
He has a gray shirt that says "Keep out of direct sunlight". 
I dyed the end in the black dye so it looks like the sun has been fading the shirt from the top down.
I also quickly cut out a large square of white flannel and used blue gel glue to write a few things on it. Used my hair dryer to speed up the drying process. (yay for impulsiveness)
Then dipped that in the black dye before dumping it out.

Note for those who like to reuse: I used an old kitty litter bucket for the dying. Once the litter is emptied I clean it up, wash it out then it can be reused. 
I have a bucket that is being used as a covered trash can. Another bucket I removed the lid completely, cleaned and dried it, and it holds my wrapping paper rolls. Then this bucket it used for things like dying, car washes, etc.

Monday, January 09, 2012

Paper Butterflies

If you have been to my house you know that I have some decorations that are directly on the wall.
The flames painted above the thermostat, the cherry blossom tree painted in the living room and the dice painted game room door just to name a few.

My newest edition is a collection of butterflies flying across the wall in the game room/library.
I took some book pages created from this project: book safe
And some old music sheets like were used in this project: music love 

I mostly hand sketched the butterflies on to the paper, then cut them out. 
I bent the wings up and attached a strip of double sided tape to the body and stuck them directly to the wall. 


Just to the right of these pictures are my bookcases and the framed "music love" piece I created so these butterflies are flying from the books and up and over the door. 


Of course if you doubt your drawing abilities you could use one of the fancy cutting machines (I don't have one but I'm sure they'd have a way to make this faster) or you could trace butterflies off something else.

Let your imagination take flight!

Saturday, January 07, 2012

Photography

Let's start with a confession:
A nice camera that matches my requirements and has good abilities, actually makes me drool...

There I said it. :)

I've long loved taking pictures. I even have the first picture I ever took.
I've leaned over cliff edges to get a good picture. I've killed a camera getting a picture (but the shot was great). And it's rare to catch me without my camera somewhere not far away.
About 7 years ago I started doing photography professionally. I've mostly shot weddings, but also newborns and kids, couples and families, from birthdays to bands. If a camera is needed I will happily be there. It's exhausting work (especially weddings) and pay is far between but it's what I love.

Extra love goes to my hubby for always keeping me supplied with hard drive space for the mass amounts of pictures I take. I know to some that seems small but when you consider that I average around 100 pictures an hour at a wedding, and most weddings last 3-4 hours. And that he usually keeps up a backup of my pictures so they don't get lost, he has the behind the scenes, but very important job of supporting me and my love.

My photography website is: Found Here
Despite facebook tending to be ripe with picture theft I made a page that can be "liked": Facebook Presence

And if you are near the Nashville, Tennessee area and want to feed my addiction, drop me a note, we'll see what we can work out! :)

Friday, January 06, 2012

Deliciocity of the Day 1-6-12

I am not a big fan of cakes, but once in a while the craving hits.

I decided to make strawberry cupcakes, with cream cheese and strawberry filling and strawberry frosting... 
I like strawberries, stop giving me that look!

I'm a semi-homemade type girl. I like taking something from the store and making it better. So I started with strawberry cake mix and made as directed. Then just before sliding them in the oven I dropped a small piece of cream cheese in the middle on top and a little bit of strawberry jam. 

Then baked as directed. Don't worry that the filling is sitting on top, it will sink as it bakes.


Once ready I allowed to cool for an hour then frosted with strawberry frosting from the store and used cupcake decorating stencils to sprinkle red sugar over some to add the extra pretty factor, on others I put a slice of strawberry.
 So delicious! I want more. And the hubby says they may not make it to church tomorrow!

Wednesday, January 04, 2012

Nativity Box

Nativity scenes can be pretty but the dusting, the wobbliness, the tiny pieces to break off. Arg!

For this nativity I bought a wood/glass box at JoAnn's. I already had the stain glass paints on hand, same with the tulle. The lights came from Dollar Tree before Christmas and run off a battery pack.

I used liquid leading and stain glass paints to make Mary, Joseph and baby Jesus on the top, a star on one side and the word "Hope" on the front.


Next I used painters tape to tape off the glass (to lazy and shaky to just fine paint it!) and painted the wood dark blue.

To finish I filled with yellow tulle and a string of yellow/gold lights.
I had already sanded out a slot in the back for the battery pack to come out for easy on/off.


I know, not a lot of "how to" but I started the box before deciding to bring life back to the blog. Future stuff will have more info.

Feel free to ask any questions!
Blast six years into the future! It's like magic hehe

My current craft projects are nearly done but then when I start new ones I'll try to document it so I can share and maybe others can get some ideas.

We can rebuild it, we have the technology... Now, do we have the time?... :)